android_learners_hub
Option Menu In Android:-
The options menu is the primary collection of menu items for an activity.
It is basically used for those tasks that have global impact on that
activity or app for example, "Setting","Search" etc. An ideal example of
option menu is shown in action bar of WhatsApp application.
The appearance of the menu items displayed on the screen by the
Option menu is totally depend upon the android version in which a
developer is developing an application:-
1.Android 2.3.x and lower :- If a developer is developing an
application for Android 2.3.x (API level 11) or lower the menu items of the
option menu will appear at the top of the screen when the user
presses the Menu button as shown in figure1. In this option menu the upper
portion or first row is the icon menu, which can hold up to 6 menu items .
If the developer wants to add seventh item into overflow menu, which the
user can open by selecting More.
2.Android 3.0 (API level 11) and higher:- If a developer is
developing an application for Android 3 (API level 11) or higher the
menu items of the option menu will display in the app bar. By
default, the system places all menu items in the action overflow, which the
user can reveal with the action overflow icon on the right side of the app
bar.
How to make Option Menu for an activity?
To create the options menu for an activity, override
onCreateOptionsMenu(). onCreateOptionsMenu() is called by the Android
runtime when it need to create the option menu. After that this method,
inflate your menu resource (defined in XML) into the Menu provided in the
callback. This method return Boolean so, you must return true this method
for the menu to be displayed; if you return false menu will not be
shown.
Example: Following are the two ways to write the code for creating
option menu( both are correct, you can choose any)
@Override
public boolean onCreateOptionsMenu(Menu menu) {
MenuInflater inflater = getMenuInflater();//Inflate the
menu
inflater.inflate(R.menu.game_menu, menu);//this adds items
from xml file to the action bar
return true;// to display menu
}
OR
@Override
public boolean onCreateOptionsMenu(Menu menu)
{
// Inflate the menu; this adds items from xml
file to the action bar .
getMenuInflater().inflate(R.menu.menu_main,
menu);
return true; // to display menu
}
How to Handle click events in Option Menu?
In option menu when user select an item from menu list the system call
your activity's onOptionsItemSelected() method. This method passes the
MenuItem selected. The system will identify the item by calling
getItemId(), which returns the unique ID for the menu item then, match
this ID against known menu items to perform the appropriate action
specified there.
Example:
@Override
public boolean onOptionsItemSelected(MenuItem item) {
// Handle item selection
switch (item.getItemId()) {
case R.id.about:// if this case is true, show_about() will execute.
show_about();
return true;
case R.id.help:
// if this case is true, show_Help() will execute.
show_Help();
return true;
default:
// if no case is true then default will execute
return
super.onOptionsItemSelected(item);
}
}
If your activity includes fragments, the system first calls
onOptionsItemSelected() for the activity then for each fragment (in the
order each fragment was added) until one returns true or all fragments
have been called.
If your application contains multiple activities and some of them provide
the same options menu, consider creating an activity that implements
nothing except the onCreateOptionsMenu() and onOptionsItemSelected()
methods. Then extend this class for each activity that should share the
same options menu. This way, you can manage one set of code for handling
menu actions and each descendant class inherits the menu behaviors. If you
want to add menu items to one of the descendant activities, override
onCreateOptionsMenu() in that activity. Call
super.onCreateOptionsMenu(menu) so the original menu items are created,
then add new menu items with menu.add(). You can also override the super
class's behavior for individual menu items.
How to change menu items at runtime?
onCreateOptionsMenu() is used only to create the initial menu state.
After exceution of onCreateOptionsMenu(), instance of the Menu will retain
in it but it cannot make changes during the activity lifecycle. To
change menu items you can use onPrepareOptionsMenu() method. This
method passes you the Menu object as it currently exists so you can modify
it, such as add, remove, or disable items.
On Android 2.3.x and lower, the system calls onPrepareOptionsMenu() each
time the user opens the options menu (presses the Menu button).
On Android 3.0 and higher, the options menu is considered to always be
open when menu items are presented in the app bar. When an event occurs
and you want to perform a menu update, you must call
invalidateOptionsMenu() to request that the system call
onPrepareOptionsMenu().
Android Popup Option Menu Example
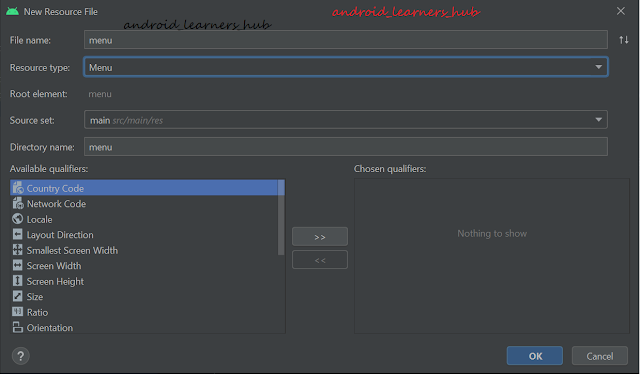
Let's first see How to create a resource file for creating menu ?
Steps to create resource file:-
Step 1
Code for menu.xml file
<?xml version="1.0" encoding="utf-8"?>
<menu xmlns:app="http://schemas.android.com/apk/res-auto"
    xmlns:android="http://schemas.android.com/apk/res/android">

    <item
        android:id="@+id/menu_1"
        android:title="New Menu" />
    <item
        android:id="@+id/menu_2"
        android:title="Settings" >
    </item>
    <item
        android:id="@+id/menu_3"
        android:title="Exit" />
</menu>
Steps to create a nested menu:-
Code for menu.xml file
<?xml version="1.0" encoding="utf-8"?>
<menu xmlns:app="http://schemas.android.com/apk/res-auto"
    xmlns:android="http://schemas.android.com/apk/res/android">

    <item
        android:id="@+id/menu_1"
        android:title="New Menu" />
    <item
        android:id="@+id/menu_2"
        android:title="Settings" >
        <menu>
            <item android:id="@+id/sub_menu1"
                  android:title="Text Size"
                  ></item>
            <item android:id="@+id/sub_menu2"
                android:title="Text Style"></item>
        </menu>
    </item>
    <item
        android:id="@+id/menu_3"
        android:title="Exit" />
</menu>
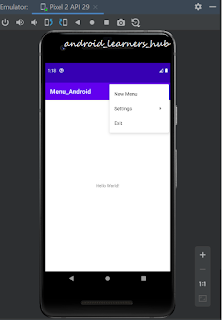
Fig 2: Output show sub items.
Code for activity_main.xml :-
Code for MainActivity.java :-
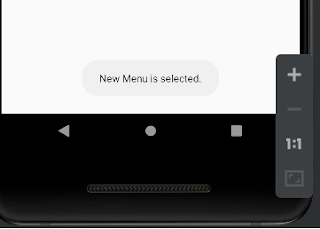
After creating menu.xml and main activity.xml files, lets create java
file to handle click event on menu items (that discussed above). Here, I
will show how to create a toast message when the menu option is
clicked.
Important : Without inflating menu.xml file to java code , option menu
will not be visible.
Code
package com.example.menu_android;

import androidx.annotation.NonNull;
import androidx.appcompat.app.AppCompatActivity;
import androidx.appcompat.widget.Toolbar;

import android.os.Bundle;
import android.view.Menu;
import android.view.MenuItem;
import android.widget.Toast;

public class MainActivity extends AppCompatActivity {

    @Override
    protected void onCreate(Bundle savedInstanceState) {
        super.onCreate(savedInstanceState);
        setContentView(R.layout.activity_main);

    }

    @Override
    public boolean onCreateOptionsMenu(Menu menu) {
        getMenuInflater().inflate(R.menu.option_menu,menu);
        return super.onCreateOptionsMenu(menu);
    }

    @Override
    public boolean onOptionsItemSelected(@NonNull MenuItem item) {
        switch(item.getItemId()){
                case R.id.menu_1:
                Toast.makeText(this, "New Menu is selected.",Toast.LENGTH_LONG).show();
                return true;

                case R.id.menu_3:
                Toast.makeText(this, "Exit is selected.",Toast.LENGTH_LONG).show();
                return true;

                case R.id.sub_menu1:
                Toast.makeText(this, "Text Size is selected.",Toast.LENGTH_LONG).show();
                return true;

                case R.id.sub_menu2:
                Toast.makeText(this, "Text Style is selected.",Toast.LENGTH_LONG).show();
                return true;

                default:
                return super.onOptionsItemSelected(item);

        }


    }
}
Output
Related Topics:


That was a huge help mam ......thank u sooo much.
ReplyDeletemy pleasure
Delete