android_learners_hub
Spannable is the interface that has powerful markup objects that you can use to style text ( a single character or a paragraph).
A text can be made clickable, scaled and colored by using span. To conclude, it is used for text styling , which I can broadly categories into two categories that are:-
1.Text metrics (changing text and background color and adding underline)
2.Text appearance (changing line height and text size)
How to use span Interface?
Step 1. Choose Class
To create a span, we can use following classes. All these classes extends spanned interface :-
1. SpannedString:- Spanned String is Immutable (means the data in it cannot be appended or changed). So, if you aren't modifying the text after creation then, you should use SpannedString class.
2. SpannableString:- Spannable String is Immutable. It is used there where you need to attach a small number of spans to a single text object.
3. SpannableStringBuilder :- Spannable String Builder is Mutable. If you want to modify text after creation, and also want to attach span to the text then, this class is perfect for that task.
Step 2. Import statement of that class. For example ,
import android.text.SpannableString; // for SpannableString class
import android.text.SpannableStringBuilder; // for SpannableStringBuilder
import android.text.SpannedString; // for SpannedString
Step 3. Write code after Calling setSpan method .
Syntax of setSpan:- setSpan(Object _what_, int _start_, int _end_, int _flags_)
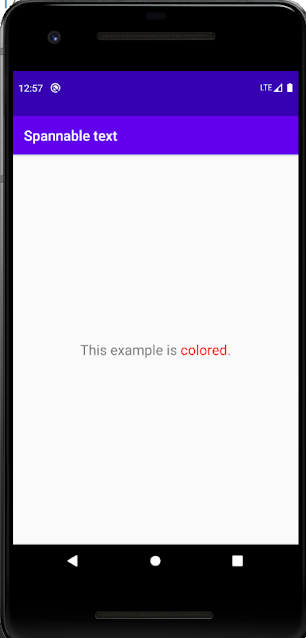
Example of setSpan:- SpannableStringBuilder spannable = new SpannableStringBuilder("This example is colored.");
spannable.setSpan(
new ForegroundColorSpan(Color.RED),// text style
16, // start
23, // end
0 // we can also use SPAN_EXCLUSIVE_EXCLUSIVE
);
Code to illustrate the above Steps:-
activity_main.xml
<?xml version="1.0" encoding="utf-8"?>
<androidx.constraintlayout.widget.ConstraintLayout xmlns:android="http://schemas.android.com/apk/res/android"
    xmlns:app="http://schemas.android.com/apk/res-auto"
    xmlns:tools="http://schemas.android.com/tools"
    android:layout_width="match_parent"
    android:layout_height="match_parent"
    tools:context=".MainActivity">

    <TextView
        android:id="@+id/text_view"
        android:layout_width="wrap_content"
        android:layout_height="wrap_content"
        android:textSize="20sp"
        app:layout_constraintBottom_toBottomOf="parent"
        app:layout_constraintLeft_toLeftOf="parent"
        app:layout_constraintRight_toRightOf="parent"
        app:layout_constraintTop_toTopOf="parent" />

</androidx.constraintlayout.widget.ConstraintLayout>
Mainactivity.java
import androidx.appcompat.app.AppCompatActivity;
import android.graphics.Color;
import android.os.Bundle;
import android.text.SpannableString;
import android.text.style.BackgroundColorSpan;
import android.text.style.ForegroundColorSpan;
import android.widget.TextView;

public class MainActivity extends AppCompatActivity {

    @Override
    protected void onCreate(Bundle savedInstanceState) {
        super.onCreate(savedInstanceState);
        setContentView(R.layout.activity_main);
        TextView textview=findViewById(R.id.text_view);
        String text = "This example is colored.";
        SpannableString ss = new SpannableString(text);
        ss.setSpan(new ForegroundColorSpan(Color.RED), 16, 23,0);
        BackgroundColorSpan bcsYellow = new BackgroundColorSpan(Color.YELLOW);
        ss.setSpan(bcsYellow,16,23,0);
        textview.setText(ss);
    }
}
Output
In the next post(Spannable Textview Part 2 - All text Styles (onlyjavaforall.blogspot.com)) I will cover all the text metrices and text appearance used in spannable textview Thanks for reading .Subscribe this blog for more updates and for any query feel free to comment.


Comments
Post a Comment